Isaac.Truett.info
How to Develop on a Pixelbook
- simple
- secure
Would you like a light-weight, powerful development machine that starts up – and updates – in a flash? I did. I've been using Chromebooks since the original CR-48, and while I loved the simplicity and ease of using the internet on one, I still needed a traditional laptop to do software development. Until now.
With the announcement of Linux application support at Google I/O this year, the promise of having a fully-functional development environment on a Chromebook (without Developer Mode) seemed in reach. That, coming on the heels of Android app support, makes for a rich library of software available on the Chrome OS platform. I decided to take the plunge, and I have been working on this website completely on my new Pixelbook for the last few days.
Let's take a look at what I did to start developing a Jekyll website on Chrome OS.
Open all sections
Enable Linux support in settings
-
How
The first thing to do is turn on Linux support
- Go to chrome://settings/?search=linux
- Click "Turn on"
- In the dialog, click "Install" (this took a few minutes)
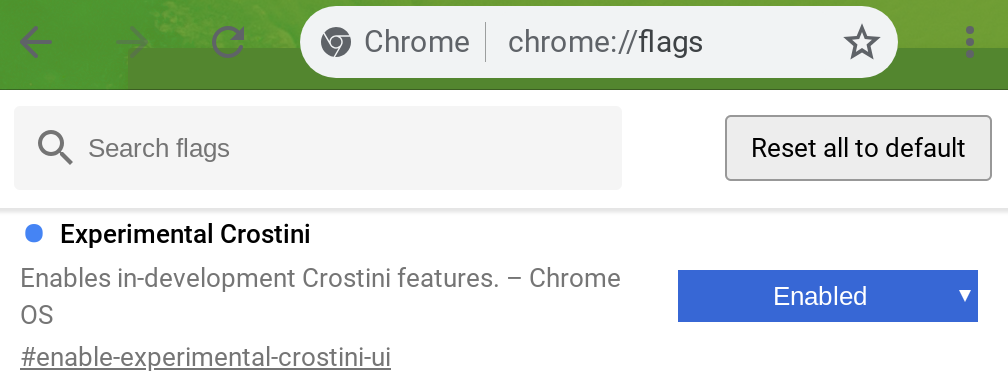
If the option isn't available under settings, you might need to enable Crostini under chrome://flags:
When the installation finishes, you should have a Linux terminal application available:

Why
- So why a Pixelbook of all things?
- As I said in the introduction, I've enjoyed using Chrome OS for a while now. I didn't know exactly which route they would take, but I was confident that Chrome OS would become a viable platform for software development enventually. While having development tools installed locally might seem to violate the principle of being "in the cloud" that Chrome OS embodies, I plan to make it super simple to get up and running, so that I could grab a new Chromebook at any point and hardly notice the setup time. And I picked the Pixelbook because I felt like treating myself to some really nice hardware.
- Why not a Windows laptop?
- I've developed on Windows for years. It's also the primary platform for computer gaming. It's also, well, a pain in the ass to maintain. OS updates are highly disruptive. Also, some development tools and web software built for Linux just won't run properly on Windows. Solutions like Cygwin are almost good enough, but introduce new incompatibilities. Windows Subsystem for Linux may close the gap on Linux support, but it won't fix the flaws in Windows itself. Plus, the Pixelbook can run Android apps. That's cool too.
- Why not a Macbook?
- I've developed on Apple hardware before, too. It's pretty close to a Linux environment, but again comes with obnoxious incompatibilities. Oh, and the price tag. Yikes. I would never buy Apple at those prices. I'm not saying the Pixelbook is cheap, but I feel like I got more out of the price I paid than I would ever get from a similarly-priced Mac.
- Why not a Linux laptop?
- I've installed and maintained Linux on my own hardware before, and while the price point of the OS is right, the driver compatibility is not. Buying a commercial laptop with Linux installed would get me supported hardware and drivers, but I couldn't find one that was priced competitively with hardware comparable to the Pixelbook.
Check out a repository
-
How
mkdir -p ~/dev/git/
cd ~/dev/git/
git clone https://github.com/itruett/isaac.truett.info
cd isaac.truett.info
Why
I use this website's repository over and over again in these examples. You can code on anything you want!
Set up development tools
-
How
sudo apt-get install ruby ruby-all-dev zlib1g-dev
sudo gem install jekyll bundler
bundle install
Why
I ended up writing a go script for this later, but I had to figure out all the things that needed to be installed first.
Start up a webserver
-
How
Now we should be able to serve our website using Jekyll. But first, we need figure out what IP address to listen to.
ip addressLook for the address that starts "inet 100.115.92." and use that IP address as an argument to the serve command:
bundle exec jekyll serve --host=100.115.92.###Why
Starting up the Jekyll web server was easy, but the website wasn't coming up in my browser at
localhost:4000like it usually does. I found that the Linux container I was running Jekyll in now was complicating things. With a little work I managed to get a series of commands that would find the correct IP address to bind to, and then I could load that in Chrome.
Install an IDE
-
How
I decided to try the Atom editor, and installation was easy:
# From https://flight-manual.atom.io/getting-started/sections/installing-atom/#platform-linux
curl -sL https://packagecloud.io/AtomEditor/atom/gpgkey | sudo apt-key add -
sudo sh -c 'echo "deb [arch=amd64] https://packagecloud.io/AtomEditor/atom/any/ any main" > /etc/apt/sources.list.d/atom.list'
sudo apt-get update

sudo apt-get install atom
Why
The set of commands first sets up a package repository where we'll get the latest version of Atom, and find updates in the future. The final command installs atom from that repository.
I have more I want to try setting up in the future, like running Java, and possibly even seeing how long the battery will last if I fire up Eclipse. But for now, this set up was enough to let me build a website on my Pixelbook where I write about building a website on my Pixelbook. Because we like it meta.